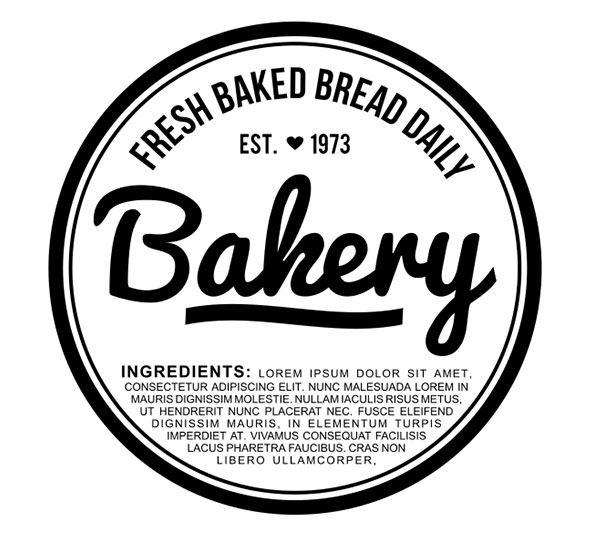
In this tutorial you'll get a proper introduction to the features of the Text Tool and Text Properties docker in CorelDRAW, through the creation of a label design for food products. Get to know how to alter horizontal type, type and edit on a curved path, and type within various shapes. I'll also give you an overview of the various options to further edit text. Fire up CorelDRAW and let's get baking!
1. The Text Tool
Step 1
This is the easiest function of the Text Tool (F8): typing on a horizontal line or within a rectangular box. Open a New Document and let's take it for a spin. Grab the Text Tool from the Toolbox, drag out a rectangle, and type out the word "Bakery". I opted for the script font Pacifico.
In the Text Properties (Control-T) docker, set the size of the font to something large, like 72 pt. You'll also see a lot of options for fills, outlines, highlights, and various style settings. For now, we're going with default settings.

Step 2
Select your text and either in the Property Bar or the Text Properties docker, set the paragraph alignment to Center. Repeat the previous step with a small sans-serif font to give your imaginary bakery a date of establishment. I chose the font Bebas for this step.

Step 3
While we're playing with tools in CorelDRAW, take the Basic Shapes Tool for a spin. You'll find it under the Polygon Tool in the Toolbox. I chose to draw a small heart in the center of my date of establishment. At this point you're free to select text objects and perfect shapes in the Object Manager and Convert to Curves (Control-Q).

2. Typing on a Path
Step 1
Group (Control-G) together the text you've drawn so far. Use the Ellipse Tool (F7) to draw a large circle around your text art. Draw a smaller circle within the first and Alignthe text group and two circles in the Align and Distribute docker to the Horizontal Center.
Set the Outline of the larger circle to 8 pt (or something with a similar thickness in appearance depending on the size of your image) and the smaller circle to 2 pt.

Step 2
Draw a third, even smaller circle in the center of your design. I set the Outline color to magenta so it's more easily seen. Keep the circle selected and use the Text Tool to select the circle's path.
Type out a phrase befitting a bakery, such as "Fresh Bread Baked Daily" or "Best Donuts in Town!" With the Pick Tool, you'll find that you can Rotate the text around the path, Scale the text to smaller and larger paths of the same shape, or Move the path in any direction.
Rotate the text along the path to the right so it's centered, and Scale it as needed so it fits into the negative space at the top of the label design.

Step 3
Change the font to Bebas once again (the same one we used for the date). ThenRotate and Move your text and make sure to Convert to Curves when you're satisfied with its placement and size. If you'd rather wait until the end of your design to Convert to Curves, feel free to do so.

3. Typing Within an Object
Step 1
Once again, draw a circle using the Ellipse Tool. In the Properties Bar, select Pie for the shape option. Set the Starting and End Angles to 0.0° and 180°. Rotate, Scale, and Move your half circle with the Pick Tool into the lower half of the label design.

Step 2
Grab the Text Tool once more and, with the half circle object selected, select within the object itself. Begin typing out whatever you want your bakery item's ingredients to be. In the Text Properties docker, set the paragraph option to Justify, make the word "Ingredients" bold, and make sure that word is several points larger than the rest of the list.
Quite happily, you'll find that your type conforms perfectly to the object's boundaries. So long as you haven't hit Convert to Curves, you can easily change the shape, position, and orientation of the half-circle text "box" to your liking.
Additionally, select your text and hit Caps > All Caps in the Text Properties docker (it's below the fill options), and never worry about using Caps Lock again (in this program, anyway).

Great Work, You're Done!
You've done an excellent job getting to know the Text Tool and some of its features. Change the colors of your design elements in the Object Properties docker, or, if you didn't Convert to Curves, you can alter your text in a variety of ways (applying various fills, outlines, highlights, and styles).
If you enjoyed this tutorial, want to brush up on your CorelDRAW knowledge, or are completely new to the program, check out some of these other tutorials aimed at breaking down the tools and their functions:
- How to Create an Easy Halloween Pattern in CorelDRAW
- CorelDRAW: Shape Building Basics
- CorelDRAW: Basic Drawing Tools


0 Response to "Cara Menggunakan Text Tool di CorelDRAW"
Post a Comment